
Homeowners who seal air leaks and add insulation save an average of 15% on heating and cooling costs, according to the EPA. That number depends on doing both jobs together — sealing the leaks and adding insulation. Insulation alone, piled onto a leaky attic floor, won’t get you there. (The EPA’s figure covers attics, floors over crawl spaces, and basements — if your basement or crawl space needs attention too, see our foundation repair services.)
This matters more now than it used to. Electricity prices keep climbing, and the federal tax credit that used to help pay for this work has expired. This guide walks through the project the way a good contractor would: measure, target, seal, insulate, verify. It also shows you how to estimate your own payback instead of relying on a national average.
Key takeaways
- The EPA’s 15% savings figure covers air sealing plus insulation — not insulation alone.
- Savings vary a lot by climate: roughly 18–20% in northern states versus 7–9% in places like Miami or Houston.
- The federal tax credit for this work expired at the end of 2025. Some websites still advertise it — that information is outdated.
- You can estimate your current insulation yourself: measure the depth in inches and multiply by 3.
- Most homes should aim for R-49 to R-60 in the attic (R-30 in the far south).
Why Start With the Roof
Heating and cooling make up about half of a typical household’s energy use — more than everything else combined. Since warm air rises and escapes through the top of a house, and the attic floor is usually the easiest place to reach (no walls to open up), it’s the highest-leverage place to start.
Most U.S. homes could use more insulation than they have. One industry-funded study estimated that roughly 9 in 10 single-family homes fall short of a reasonably modern energy code — take the exact number with a grain of salt since insulation manufacturers funded the research, but the general point holds up. ENERGY STAR notes a poorly insulated home can easily run 10% higher utility bills than a well-sealed one.
If your roof itself is aging or showing wear alongside thin insulation, it’s worth having both looked at together — see our roof installation services or browse our full roofing services overview.
Before You Begin
What you’ll need: – A tape measure, a flashlight, and your phone for photos – Safe attic access (pull-down stairs, a hatch, or a ladder) – Your last 12 months of utility bills, for the payback math later – About 20–30 minutes to assess the attic yourself; a professional install typically takes half a day to a full day
Assessing your attic is a beginner-friendly task. Actually sealing and installing insulation is better left to a contractor unless you’re experienced.
Safety note: If you see knob-and-tube wiring (more common in older homes — see our historic home restoration work if your house falls into that category), signs of moisture or mold, or vermiculite insulation (a possible asbestos source), stop and call a professional instead. Existing moisture or mold is also worth having assessed by a fire and water damage restoration specialist before you insulate over it. And if your home has a cathedral ceiling with no accessible attic, you can’t do this assessment yourself — hire an energy auditor or insulation contractor.
Step 1: Measure What You Have
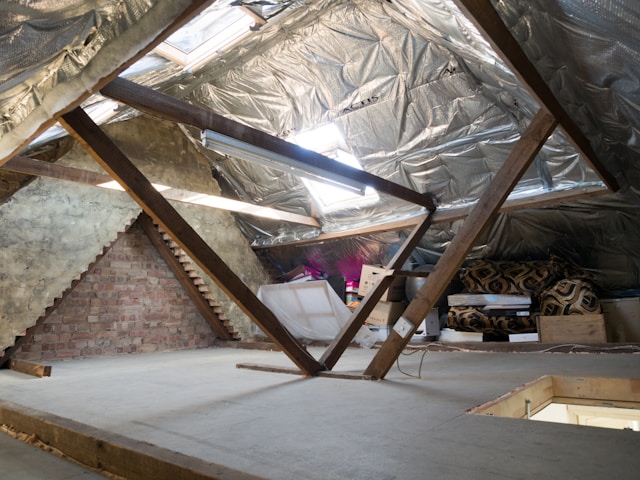
- Open the attic hatch and look across the floor. If you can see the tops of the floor joists poking through, you almost certainly need more insulation.
- Push a ruler straight down to the drywall in three or four spots — coverage is often uneven.
- Multiply the depth in inches by 3. Most common materials (fiberglass, cellulose, mineral wool) provide about R-3 per inch, so this gives you a reasonable estimate.
For example, 5 inches of insulation is roughly R-15; 8 inches is roughly R-24.
Write down your average depth and estimated R-value, and snap a photo of the attic floor — it’s useful when comparing contractor quotes later.
Step 2: Find Your Target
Your target R-value depends on where you live and how much insulation you already have. As a simple rule of thumb: aim for at least R-38 in the southern U.S. and R-49 in the north. If you’re more than 4–6 inches below that, or your joists aren’t fully buried, it’s worth adding more.
(A more detailed breakdown by climate zone is available from ENERGY STAR if you want to double-check your specific target.)
If the gap between what you have and what you need is R-19 or more, this project is very likely worth pricing out.
Step 3: Seal Before You Insulate
This is the step people skip — and the reason some insulation jobs disappoint. Insulation slows heat moving through material, but it doesn’t stop air physically leaking through gaps around recessed lights, plumbing, wiring, and the attic hatch. Blow insulation over an unsealed floor and you’ve added a filter, not a barrier. The EPA’s 15% savings figure assumes real sealing work happens first, not just added insulation.
The main places to seal, roughly in order of payoff: – Gaps in interior wall top plates – Plumbing and wiring penetrations – Recessed light housings – Chimney and flue chases – The attic hatch itself (weatherstripped and insulated)
A blower-door test before and after is the most honest way to confirm the sealing worked — ask your contractor if they offer one.
Step 4: Choose a Material
For a typical vented attic, you’re usually choosing between two blown-in materials:
- Blown fiberglass — doesn’t settle much, non-combustible, good for deep coverage over an uneven floor.
- Blown cellulose — made from recycled content, denser, fills gaps around obstructions well, but settles a bit over time (installers compensate by adding extra).
Both can easily reach R-49 to R-60. Batts (the rolled kind) work fine in a clean, regularly-spaced attic, but most real attics are too irregular for a clean batt install.
Spray foam is a different choice entirely, not just a pricier version of blown insulation. Applied to the underside of the roof deck, it turns the attic into conditioned living space — a good option if you have ductwork up there, but it costs more and changes how the roof dries out, so it’s worth discussing with a roofing contractor familiar with your specific roof installation, not just an insulation installer.
One rule regardless of material: never cover the soffit vents. Use baffles to keep air flowing, or you’ll trade an energy problem for a moisture problem — the same soffits and gutters that keep water moving off your roof, which is where our siding and gutter services come in if those need attention too.
Step 5: Estimate Your Own Payback
Generic “insulation pays for itself in X years” claims aren’t very useful, because savings vary a lot by climate — from about 7% in Miami to 20% in Seattle. Here’s how to get a number that’s actually yours:
- Add up a full year of energy bills (electricity, gas, oil, or propane) — call it your annual total.
- Multiply by your region’s expected savings percentage. Warmer climates tend to land around 5–8%; colder climates around 14–16%. (The national average is about 11%.)
- Get a written quote. As a rough sanity check, national estimates put professional attic insulation somewhere in the range of $3.50–$7.50 per square foot, though your actual price depends heavily on your attic’s access and condition. If you’re bundling this with roof work, our instant roofing estimator is a fast way to get a ballpark on that side of the project.
- Divide the quote by your estimated annual savings — that’s your simple payback period in years.
For example: a household spending $2,800 a year on energy, in a region with 12% expected savings, would save about $336 a year. Against a $4,000 quote, that’s roughly a 12-year payback.
That number can shrink a lot with rebates, rising electricity rates, or a smaller partial top-up job — and it doesn’t even count the comfort improvement, which many homeowners notice before their bills change.
Step 6: Find the Rebates That Still Exist
The federal tax credit for this kind of work (known as 25C) expired at the end of 2025 and is no longer available for new projects — even though some websites, including a few government ones, still advertise it. Don’t let an outdated credit factor into your budget.
What’s still available: – State-run rebate programs (funded federally but administered state by state), which can cover up to roughly $1,600 for insulation and air sealing combined. Not every state has launched its program yet, so check before assuming you qualify. – Utility rebates — often the fastest option, and usually unaffected by federal changes. Many utilities also offer free or discounted energy audits. – The Weatherization Assistance Program, which covers the full cost of this work for income-qualified households. – Various state and local programs, which vary widely by location.
Check your state energy office and your utility’s rebate page before you schedule anything, and get any rebate requirements in writing.
Step 7: Verify the Work
Blown insulation is sold by depth, and it’s easy to under-deliver if nobody checks.
- Ask for a coverage certificate listing the material, coverage area, and installed R-value and depth.
- Check the depth rulers that should be stapled to the joists throughout the attic.
- Confirm the soffit vents are open and the attic hatch is insulated and weatherstripped.
- If air sealing was part of the job, ask for the post-work blower-door number.
A good job looks like: joists fully buried, even depth across the whole floor, no gaps near the eaves, and paperwork that matches your quote. You’ll likely notice the comfort difference within a season; the billing difference is clearest after a full year.
Common Mistakes to Avoid
- Insulating over an unsealed attic. It’s cheaper for the installer but caps your results — seal first.
- Budgeting around the expired federal credit. Build your numbers around utility and state rebates instead.
- Blocking the soffit vents. This invites moisture and rot — baffles are cheap insurance.
- Skipping the measurement step. Adding R-30 to an attic that already has R-30 does far less than bringing a bare attic up to R-49.
- Trusting a national average. Your climate zone matters more than any single number in this article.
Frequently Asked Questions
How much can roof insulation really save on my energy bills? On average, about 15% on heating and cooling, or 11% on total energy costs — but your actual number depends heavily on your climate.
Is there still a federal tax credit for insulation in 2026? No. It ended for any work completed after December 31, 2025. Look to state and utility rebates instead.
How do I know if I have enough attic insulation? If you can see your floor joists, you probably don’t have enough. Measure the depth and multiply by 3 for a rough R-value, then compare to R-38 (south) or R-49 (north).
Can I install attic insulation myself? The measuring and assessment, yes. The actual air sealing and installation are usually better left to a professional — mistakes near recessed lighting or flues carry real fire and moisture risk, and some rebates require a certified contractor anyway.
Does insulation help in summer, or only winter? Both. Cooling is roughly half of that heating-and-cooling energy use, so insulation helps year-round — including in warm climates.
How long does attic insulation last? Blown fiberglass and cellulose don’t really wear out in a dry attic. The usual reason to redo the work is a roof leak (if that happens, get it looked at quickly — see our emergency roofing services), a pest problem, or a change in recommended R-values — not the insulation aging out.
Pairing This With Other Home Upgrades
Insulation rarely happens in isolation. If you’re already opening up the attic or having a contractor out, it’s often worth handling related exterior work at the same time — siding and gutters, vinyl siding installation, or exterior painting can all affect how well your home holds onto the energy savings you’re paying for.
The Bottom Line
- Measure first: depth × 3 gives you a starting R-value.
- Aim for R-49 to R-60 in most of the country (R-30 in the far south).
- Seal air leaks before adding insulation — this is what makes the EPA’s savings numbers real.
- Estimate your own payback using your actual bills and climate.
- Look to utility and state rebates, since the federal credit is gone.
- Ask for a coverage certificate that matches what you paid for.
Electricity prices are heading up, not down — so the value of getting this done only grows the longer it’s put off.
Get a Number for Your Own House
Most of this guide is designed to be done before anyone sells you anything: measure your depth, find your zone target, and calculate the gap. If that gap is R-19 or more, the next step is a written quote that itemizes air sealing separately from insulation and states the installed R-value in writing.
CRF Roofing provides attic and roof assessments across Southeastern and South-Central Indiana, including Bartholomew, Dearborn, Decatur, Franklin, Jefferson, Jennings, Ripley, Rush, and Shelby counties, plus Greensburg — see our full list of areas we serve. Contact us for a free assessment, browse past projects, or learn more about our team. You can also explore our full range of services or read more on our blog.
Conclusion
Roof insulation is one of the few home upgrades where the assessment is genuinely free, the physics is uncomplicated, and the payback is calculable in advance. Measure first, seal before you insulate, and run the numbers on your own bills and climate rather than a national average — and if your roof needs attention alongside your attic, that’s exactly what we handle.