
The roof installation process requires careful planning, material selection, and professional execution. We’ll begin with thorough inspections to identify damage, followed by preparing your property for installation. The process includes tear-off, deck inspection, waterproofing with underlayment, and proper installation of shingles, flashing, and ventilation systems. Quality assurance inspections and complete site cleanup conclude the project. Our detailed guide covers each critical step to guarantee your new roof provides decades of protection.
Key Takeaways
- The process begins with a thorough inspection to identify damage and determine if a complete tear-off is necessary.
- Professional installers apply underlayment, ice and water shields, and drip edge before installing shingles with proper nail placement.
- Quality flashing installation around penetrations, valleys, and roof-wall intersections is critical for preventing water intrusion.
- Proper ventilation systems including ridge and soffit vents must be installed to prevent moisture buildup and extend roof lifespan.
- Final quality inspection confirms workmanship standards before debris removal and providing maintenance recommendations to property owners.
Assessing Your Roof Replacement Needs
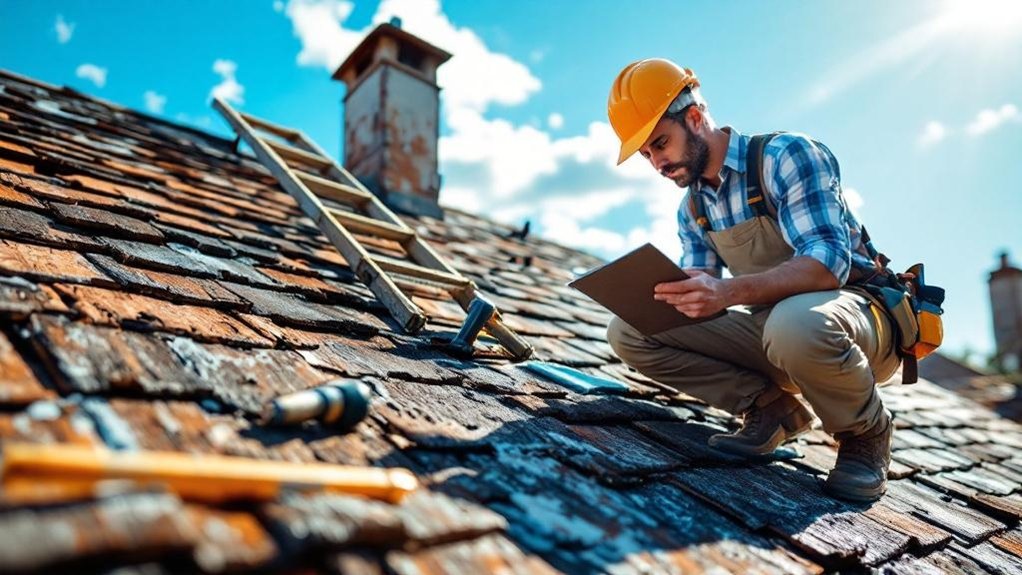
When should you consider replacing your roof rather than simply repairing it? At CRF Roofing & Restoration, we start with a thorough roof inspection to identify critical warning signs. Missing, cracked, or curling shingles greatly compromise your roof’s water-shedding capability. Moss growth and debris retention lead to accelerated shingle degradation and underlying wood rot. Understanding your insurance claim options can also influence your decision on whether to repair or replace your roof.
During our damage assessment, we evaluate structural integrity by identifying soft spots in the roof deck and improper fastening to rafters. We’ll document water intrusion evidence through attic inspections, checking for displaced insulation and mold growth. We recommend post-storm inspections as these events often cause hidden damage that can worsen over time if left unaddressed. We take a minimum of four elevation photos plus detailed damage documentation to provide you with a complete analysis. As Owens Corning Preferred Contractors, we’ll help you determine whether repair or replacement offers the most protection for your home.
Planning and Preparation: What to Expect Before Installation Day
Before your roof installation begins, we’ll help you plan your budget with transparent pricing and financing options while guiding you through material selections that balance quality, durability, and aesthetic appeal. Our expert roof installation services provide a reliable foundation for your new roofing system. We’ll provide an extensive preparation checklist covering interior safeguards (securing breakables, protecting furniture) and exterior requirements (clearing access areas, accommodating equipment placement). Our team will coordinate all necessary permits, scheduling, and specialized services to guarantee a smooth, efficient installation process that minimizes disruption to your daily routine. Experts recommend documenting final payment terms and collecting all warranty paperwork for your premium roofing solutions.
Planning Budget Wisely
Although many homeowners focus primarily on material costs when planning a roof installation, thorough budget preparation requires accounting for numerous additional expenses that markedly impact your total investment. Our cost estimation process includes often-overlooked factors such as permit fees, which vary by jurisdiction but are ultimately passed to you even when we handle the paperwork.
Proper budget allocation must incorporate verification expenses for contractor credentials, HOA approval fees, and potential weather delay contingencies. We recommend factoring in property protection costs—from landscape coverings to temporary vehicle relocation—and service coordination expenses for satellite dishes or solar panels. Consider including expenses for solar panel removal and reinstallation to prevent damage during the roofing process. When comparing quotes, evaluate not just the bottom line but also warranty coverage, emergency response capabilities, and regulatory compliance measures to avoid costly surprises later.
Selecting Quality Materials
Selecting the right roofing materials represents one of the most critical decisions you’ll make during your roof installation project, as it directly impacts your home’s protection, energy efficiency, and long-term value. At CRF Roofing, we’ll guide you through evaluating each option’s material longevity against your climate needs—from architectural asphalt shingles lasting 20-30 years to slate options exceeding 50 years.
We consider your home’s structural capacity, as heavier materials like clay tiles require adequate support, while lighter alternatives like stone-coated metal can often install over existing shingles. Additionally, matching materials to your home’s architectural style enhances curb appeal and overall aesthetic cohesion. We’ll help balance initial investment against lifetime performance, ensuring your selection delivers both aesthetic appeal and practical performance. As Owens Corning Preferred Contractors, we provide exclusive warranty options that maximize protection for whichever premium material suits your home best.
Preparing Your Home
Proper preparation for your roof installation greatly impacts project efficiency, property protection, and overall satisfaction with the final results. We recommend thorough contractor verification—checking licensing, insurance, and references—before committing to any roofing project. Once you’ve selected our team, we’ll help you prepare both exterior and interior spaces. Consider scheduling your installation 4-6 weeks in advance to allow adequate time for inspection, permitting, and material ordering. Clear your driveway for equipment access and protect landscaping by removing outdoor décor and marking sprinkler heads. For interior protection, remove wall hangings and secure items that might be affected by vibration. Cover attic belongings with protective sheeting to prevent dust infiltration. We’ll coordinate all necessary permits and establish clear communication protocols, including daily updates and emergency contacts. This extensive preparation guarantees a smooth installation process with minimal disruption to your daily life.
The Material Selection Process: Options and Considerations
At CRF Roofing & Restoration, we’ll guide you through selecting the best roofing material from options including budget-friendly asphalt shingles, long-lasting metal, elegant slate, or weather-resistant TPO systems. Proper installation also requires consideration of underlayment requirements for comprehensive moisture protection. We carefully balance initial cost considerations against long-term durability, helping you determine whether a $5,000 asphalt installation or $15,000 premium metal roof represents better value for your specific situation. Your local climate conditions—including heat exposure, wind patterns, snow load requirements, and moisture levels—will greatly influence our material recommendations to guarantee maximum performance and longevity for your specific property. Additionally, we emphasize the importance of customer satisfaction in our material selection process to ensure that you are happy with your roofing choice for years to come.
Material Types Overview
When commencing on a roof installation project, the material selection process represents one of the most critical decisions homeowners will make. At CRF Roofing & Restoration, we offer diverse options to suit your specific needs.
Traditional asphalt shingles provide cost-effective material performance with excellent fire resistance, while natural stone options like slate offer century-long durability. Our synthetic alternatives mimic premium appearances without requiring structural reinforcement, balancing aesthetics with practicality. Cedar provides natural insulation and insect resistance, though requires proper fire treatment with modern installation techniques. Metal roofing stands out for its significantly longer lifespan compared to conventional materials.
For low-slope applications, we recommend EPDM or PVC membrane systems, delivering 25+ years of protection. As Owens Corning Preferred Contractors, we’re uniquely positioned to advise on which material will best protect your investment while complementing your home’s architectural style and meeting your budget requirements.
Cost vs. Durability Balance
The careful balance between upfront costs and long-term durability forms the cornerstone of intelligent roofing decisions. At CRF Roofing, we analyze this relationship through extensive cost analysis of initial investments versus lifetime value.
While asphalt shingles offer affordability at $80-250 per 100 square feet, their 15-25 year material longevity means more frequent replacements. Contrast this with slate’s premium pricing ($12-$30 per square foot) but exceptional 75-200 year lifespan. Installation quality significantly impacts how long any roofing material will last, as proper installation techniques are essential for maximizing durability. Metal options bridge this gap, costing 2-4 times more than asphalt but lasting 30-70+ years.
We calculate total ownership costs by dividing initial investment by expected years of service. This reveals that higher upfront investments in premium materials often deliver superior long-term value while enhancing property resale potential through improved curb appeal and reduced maintenance requirements.
Climate Considerations
Climate selection stands as perhaps the most critical factor when determining ideal roofing materials for your specific location. At CRF Roofing & Restoration, we assess climate impact on material performance extensively before making recommendations.
Hot, dry regions benefit from clay tiles and reflective metal roofing that minimize heat absorption. Cold, snowy areas require materials like slate or standing seam metal that withstand freeze-thaw cycles and shed snow effectively. For humid, tropical climates, we recommend algae-resistant asphalt shingles or coated metal options that resist moisture damage.
Wind-prone locations demand specialized installation techniques with high-wind-rated materials. Coastal properties require materials with saltwater corrosion resistance to maintain structural integrity over time. We consider how UV exposure, temperature fluctuations, and precipitation patterns affect durability in your specific region, ensuring your investment delivers peak performance through all seasons.
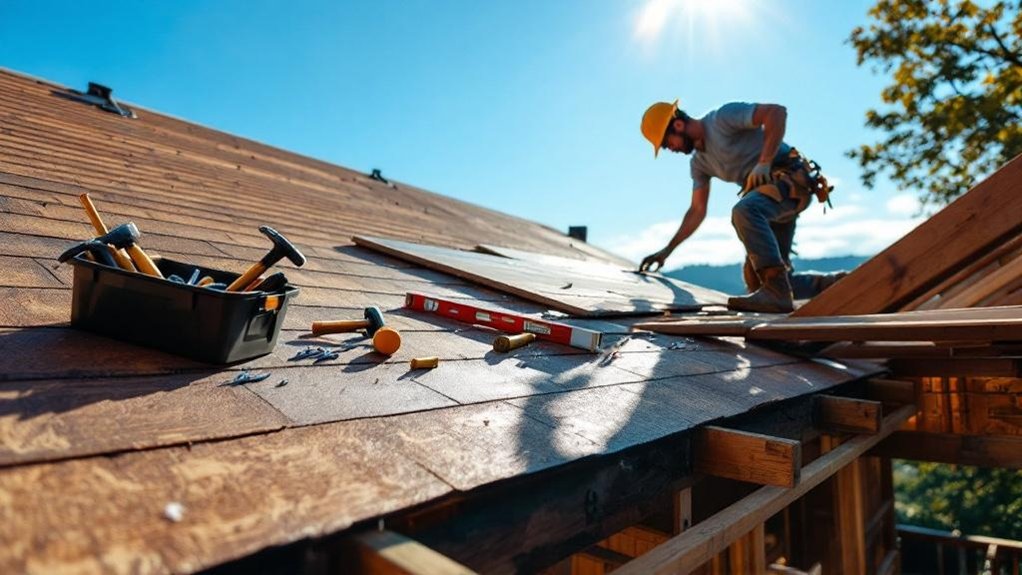
Tear-Off Day: Removing Your Old Roofing System
Stripping away your old roofing system marks the official beginning of your roof replacement journey. Our team starts with a thorough pre-tear-off inspection to determine if complete removal is necessary based on structural integrity, layer count, and material compatibility. We also assess for energy-efficient roofing options that may enhance your new roof’s performance.
We implement proven tear off techniques, working systematically from the ridge cap downward using specialized tools like roofing shovels and forks. Our crews secure the perimeter with tarps and plywood to protect your landscaping and property before any shingles are removed.
As certified Owens Corning Preferred Contractors, we’re meticulous about debris disposal, immediately clearing stripped materials into designated containers. This comprehensive removal provides a clean slate for your new roofing installation. After removing all shingles, underlayment, and flashing down to the deck, we thoroughly sweep the surface and use magnetic tools to collect every stray nail.
Deck Inspection and Structural Repairs
Once your old roofing material has been completely removed, our expert team conducts a thorough deck inspection—the essential foundation for your entire roofing system. We systematically evaluate deck integrity by walking the surface, identifying soft spots and determining the feel underfoot. This process helps detect hidden damage that could lead to severe issues if left unaddressed.
As Owens Corning Preferred Contractors, we’re meticulous about documenting structural anomalies that could compromise your roof’s load-bearing capacity. We examine the underside through attic access, checking for water stains, proper ventilation, and secure fastening to rafters.
Per IRC R903.2 requirements, we’ll replace any cracked or damaged decking before installation. This critical evaluation identifies sagging areas, deformation, or moisture intrusion that would otherwise remain hidden. Following InterNACHI standards, we pay special attention to structural integrity which is crucial for homes in St. Louis that must withstand heavy snowfall in winter. Trust that we’re creating a rock-solid foundation that protects your home for decades to come.
Waterproofing Your Home: Underlayment and Barrier Installation
After removing the old roofing material and ensuring your deck is structurally sound, we’ll begin the critical waterproofing phase that creates an impenetrable moisture barrier beneath your visible roofing materials.
We start by thoroughly cleaning the deck, then installing ice and water shield around all penetrations. Next, we’ll apply your chosen underlayment types—either traditional 30-pound felt or premium synthetic materials—working systematically from the lowest point upward. Each row overlaps the previous by 6 inches, with 2-inch side laps, creating a continuous water barrier. We install a drip edge along the roof’s eaves to effectively direct water away from your home’s foundation. The importance of using proper substrate preparation cannot be overstated, as it ensures optimal adhesion and longevity of your roofing system.
Our team secures materials using plastic cap nails spaced 12 inches apart, ensuring proper adhesion to your deck. We’re meticulous about smoothing each layer to eliminate bubbles or creases that could compromise your home’s protection against moisture intrusion.
The Step-by-Step Shingle Application Process
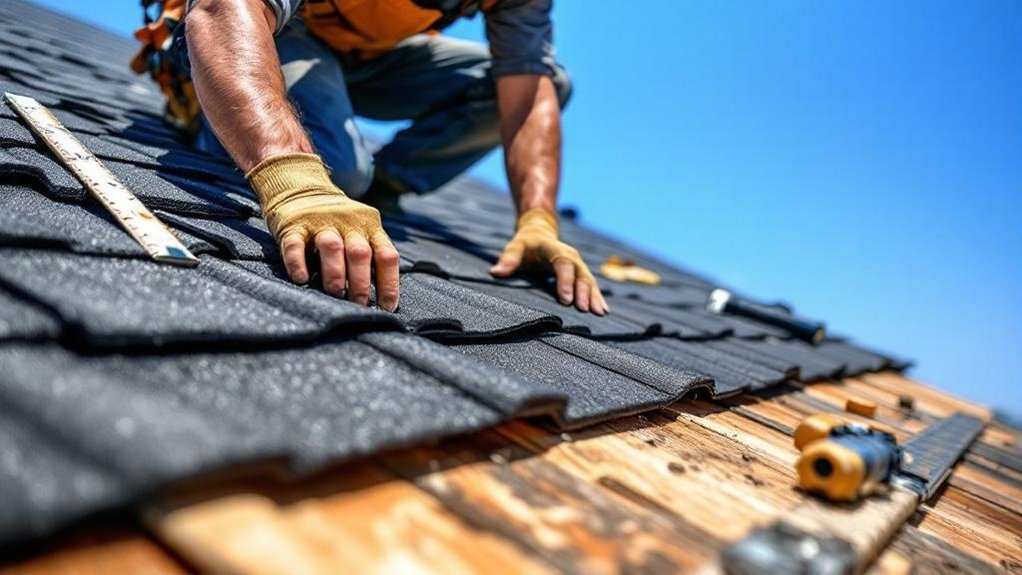
The proper installation of shingles forms the heart of a successful roofing project, building upon the waterproofing layers we’ve just established. We begin by installing starter strips along eaves and rakes, securing them with 4-5 nails near the tar line with a 1/8-inch overhang beyond the drip edge.
Next, we lay the first course along the bottom eave, maintaining proper shingle alignment techniques with chalk lines to guarantee parallelism. Our nail placement strategies include using 4-6 galvanized nails with 3/8-inch heads, positioned according to manufacturer specifications and wind exposure requirements. Remember that proper nail placement ensures wind-resistance as nails must be flush with the shingles without cutting into them. Additionally, utilizing high-quality materials is essential to enhance the durability and longevity of the roof.
Around penetrations, we custom-cut shingles and install appropriate flashing with roofing cement for waterproofing. Finally, we complete the installation with ridge shingles, securing each with precise nailing on both sides for lasting protection.
Ventilation Systems and Flashing: Critical Components for Longevity
While the roof’s primary structure and shingles form its visible exterior, proper ventilation systems and strategic flashing installation represent equally critical components that determine your roof’s long-term performance. As Owens Corning Preferred Contractors, we install thorough ventilation solutions that include ridge vents working on convection principles and soffit vents serving as intake points—creating balanced airflow that prevents moisture buildup and extends roof lifespan. We also offer solar-powered vents that provide an eco-friendly option reducing energy consumption by up to 30% on power bills.
Our flashing materials include aluminum, copper, and galvanized steel, each strategically applied at roof-wall intersections, valleys, and around penetrations. This ventilation-flashing integration is essential for preventing water intrusion while accommodating thermal expansion. We guarantee ventilation effectiveness through proper placement of ridge vents with protective baffles and soffit vents that draw in fresh air—systems that work together to maintain consistent attic temperatures and prevent ice dam formation.
Final Inspections and Site Cleanup
Completing your roof installation project properly requires a thorough final inspection process and extensive site cleanup to confirm both quality workmanship and customer satisfaction. We guarantee all permits and approved plans remain on-site during inspection, with job addresses clearly posted for verification purposes.
Our inspectors meticulously assess structural integrity, checking that all materials meet Class A fire retardant ratings and are fastened according to manufacturer specifications. We verify proper ventilation, examine flashing around penetrations, and assess drainage systems to prevent future problems. Our professionals always wear appropriate safety gear during final roof inspections to ensure their protection while thoroughly evaluating your installation, as well as adhering to high safety standards to mitigate potential risks.
Once inspector signatures and final documentation are complete, we conduct detailed site cleanup, removing all debris and materials. We’ll provide detailed maintenance recommendations and verify your gutters are properly secured and functioning, leaving your property in pristine condition—just one more way we honor our commitment to excellence.
Frequently Asked Questions
Can I Stay in My Home During Roof Installation?
Yes, you can stay home during our roof installation. We manage noise concerns with efficient workflows and implement stringent safety precautions to protect your family while we transform your home’s protective barrier.
How Does Extreme Weather Affect My Roof Installation Timeline?
Extreme weather greatly impacts your timeline. We’ll experience installation delays during rain, high winds, and temperature extremes that affect material performance and crew safety. We’ll adjust our schedule accordingly to guarantee quality results.
Will a New Roof Increase My Home’s Value?
Yes, a new roof will increase your home’s value. We’ve observed 60-70% ROI on investments, with significant roof appraisal improvements that enhance curb appeal and boost resale value for our community members.
How Long Should I Expect My New Roof to Last?
Your new roof’s lifespan varies by materials: asphalt shingles (15-30 years), metal (40-80 years), or slate (60+ years). We recommend regular maintenance inspections to maximize durability—our homeowners consistently see extended performance through proper care.
What Financing Options Are Available for Roof Replacement?
We offer multiple financing solutions through our partnerships, including zero-interest payment plans and third-party loan options. As a Preferred Contractor, we’ll help you navigate these financial pathways with personalized guidance.
Conclusion
In summary, we’ve outlined the thorough process we follow for your roof installation. Our meticulous approach guarantees structural integrity through proper deck inspection, underlayment application, and precise shingle installation. We’ve detailed how we’ll handle ventilation systems and flashing components that protect your investment. Remember, our final inspection protocols verify that all manufacturer specifications have been met before we consider your project complete.